![]() On-line Help
On-line Help
<< 3.1 Operations Bar >>
Operations Bar provides options to carry out the high level image operations, such as load, save, etc.
![]()
Load Image
Brings up the standard Windows "Open File" dialog, for you to locate and open an image in BlackMagic. Supported image types can be accessed through the "Supported File Types" filter list. After locating and selecting the image file, click on "Open" to open the image, or "Cancel" to return to BlackMagic without loading an image from disk.
When you open an image, the BlackMagic progress meter shows up tracking the initialization procedure; depending upon the size of the image, the initialization process could take a while. Please wait until this progress meter disappears, before starting work on the image.
The Image loading process will fail if there is insufficient memory, or if you select an unsupported image type.
Scan Image
You must have a TWAIN compatible scanner connected, and the necessary driver installed, to be able to scan a photo into BlackMagic. For more information on the capabilities and setup of your scanner, please refer to the scanner documentation.
If the device is connected and setup properly, clicking on this button should bring up the scanner dialog; the options may vary (refer to the scanner documentation for more info. on these). The most common options refer to type of image to scan (select Colour Image), scan resolution (see the comment on scan resolution below). Follow the screen prompts to scan in your photo; once this is done, the image should appear in BlackMagic as described under "Load Image".
Scan Resolution: When you scan a photo through a scanner, you usually have a choice as to the resolution you scan it at; this is generally specified in a unit called "dpi" or dots per inch. This is because your computer reads and displays an image as a series of 'dots' (pixels) in a matrix form across the width and height of the image. The dots are so close together, that the appear as a regular photo. In contrast to this, a 'regular' photo taken with a camera (except for ones shot with a digital camera, and/ or printed on a 'non dye-sub' computer printer) is normally "continueous tone". So, to get your photo in printed form into the computer, the scanner performs a translation into the "dpi" format. The dpi resolution measure specifies how many of such pixels/ dots represent one-square-inch of the printed photo. If you think about it, the higher the value for "dpi", the finer/ sharper your image will look (unless the printed photo itself exists in a dot-matrix form, where the maximum resolution can not be any better than the one that exists on paper). However, scanning at a higher resolution also has a disadvantage: the higher the "dpi", the larger will be your 'imported' image, and more time it will take to colourize it (since you have more area to paint). Because colourizing with BlackMagic is so quick and easy, this is usually not a problem.
So the bottom-line to consider while deciding on the "dpi" to scan at: what size do you want to print-out/ save your colourized photo at. Generally, if you scan a photo (of the non digital type) which is, say, 6" by 4", then scanning it at 100-200 dpi is sufficient to get a decent quality print out that fits to a "letter size" paper (8.5" X 11"). If you wish to print out a larger size after colourizing, increase the scan resolution proportionately. Please refer to your scanner manual for the maximum supported resolution. Be prepared to have lots of memory "RAM" available, and a fast CPU/ graphics sub-system, if you intend to process images in BlackMagic scanned at resolutions of 400 dpi or higher. As an example, you should not have a problem scanning and processing a 4" X 6" photo at 400 dpi on a computer equipped with 128MB RAM, and 1 GHz Pentium IV CPU. For 200dpi, you should be fine with 64MB RAM and a Pentium III at 500MHz.
Colour or B&W : Scanners also generally provide the option to scan a photo as Black & White, or True Colour. Your choice on this depends on whether you intend to use BlackMagic for 'Colour Correction', or for colourizing from a black & white source. In case of the former, you would be better off scanning the photo as 'Colour', while in the later case, you do not gain anything by doing so, so you might as well scan it in as a Gray-scale (the scan may be faster).
Temporary Space & Multiple Scans: BlackMagic uses the temporary windows directory ("temp" folder under your Windows directory) to make temporary copies of images. This is also true when you scan an image. The Files are generally saved as "btf1.bmp", "btf2.bmp", etc., (older ones are overwritten). You should ensure that there is sufficient free space in the host drive at all times. If you run out of space on the drive, you may clean-up all the "btf" files from this location. If you scan more than one image in one go, the first one to be scanned is the one that is opened in BlackMagic. Once you are done with this one, you may save it (see below), and then load the others one by one from the Windows temporary folder ("btf2.bmp", "btf3.bmp", etc.) by using the "Load Image" option (as described above). BlackMagic cleans these files out once only, each time you close the BlackMagic application.
SaveAs
This brings up the standard Windows "Save File" dialog; move to the folder into which you want to save the file, then specify a file-name in the Filename edit box. You should ensure that there is sufficient disk space free in the drive, before doing a "Save". "Cancel" exits to BlackMagic without saving. You should make a habit of saving your image periodically while colourizing it; specify a file-name the first time, then save to the same file during subsequent saves (responding "yes" to the 'Overwrite File?' prompt). The supported save file types are listed, and may be selected, from the "Filetypes" filter list box.
Use this button to print-out a hard copy of your photo images. You must have a good quality colour printer capable of photographic class output, in order to get an optimal printout. It is important to bear a few facts in mind here:
1. Due to the difference in the way the colours get displayed on the screen (RGB) vs. how these are output on to paper (CMYK), its unreasonable to expect a 'precise' match between the two.
2. The colours on screen generally appear more vibrant (compared with the printout) due to the fact that the screen is lit-up from behind.
3. Before drawing any comparison between the screen vs. printout versions, ensure that your screen is set to display correct colour temperatures, the full gamut of colours, as well as optimal brightness & contrast settings. The best way we know of doing this for the average home PC owner (though there are some colour caliberation systems available in the professional environment), is to take one of your best colour photos from the family album, scan it into your computer and display it on the screen, put the actual photo besides the screen, ensure proper 'white light' illumination in the room, then adjust all your screen/ display settings until there is as close a match between the two versions as possible. Even so, you could go wrong due to inappropriate scanner settings, etc.
4. If you have your camera film processed, then take it to
different colour processing labs to get printed copies, chances are that there would be
significant differences in colours amongst these prints. This should give you an idea of
the difficulty of the task you are faced with here.
The good news is that BlackMagic Colour Palettes are based on the TimeBrush RLC
(RealLifeColour) standard, the technology developed for colourizing Hollywood class
classic b&w movies. It uses state of the art Neural Net based algorithms to render
colours that are closest to the colours we see in 'natural' objects. This acts as your
guarantee of colour quality that BlackMagic renders. Also, for most home users of this
software, the matching of colours is not so important; if it looks good, that's good
enough!
Clicking on the "Print" button brings up a dialog box as shown below; the picture is followed by a description of each option.
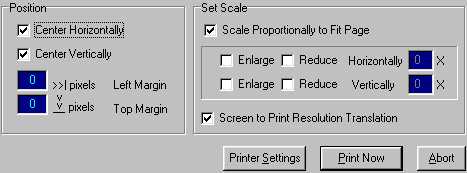
Center Horizontally / Center Vertically: Having either of these boxes checked, centers the printed image on the paper, in relation to the overall paper 'width' & 'height', respectively.
Left Margin / Top Margin: Enter value (pixel units) in the corresponding box to leave that much blank space (margin) from the 'Left' & 'Top' of the paper, respectively.
Scale Proportionally to Fit Page: 'Check' the box if you wish to enlarge/ reduce the image automatically (and proportionally), to fit within the confines of the defined margins and the overall paper size and orientation.
Enlarge / Reduce / Horizontally / Vertically: Provides a means to scale the width and/ or height of the image according to the scaling factor specified in the corresponding box; whether the image is enlarged or reduced by this factor, depend upon whether the corresponding "Enlarge" or "Reduce" box is checked.
Screen to Print Resolution Translation: The screen resolution (number of pixels in an inch of space) is mostly quite different that that of a typical graphics printer. as a result, when you print an image, it may not appear on paper to be of the size that you expected. Having this Check-box in the "Checked" state tells BlackMagic to try and translate between the two resolutions, so that the printed output size resembles more to what you see on the screen. For very high resolution image printing on high resolution professional photo printers, this may sometimes be un-desirable; in that case "Un-check" this box. On the other hand, not having this option selected for printing on an average home printer may provide only a very small size print out. Note: this setting does not have any effect when the "Scale to Fit Page" option is selected.
Printer Settings: Clicking on this button brings up the "Printer settings" dialog box relevant to your specific Printer and the driver software. For details on various options there-of, please refer to your Printer Manual. Generally speaking, you would use the settings dialog to define which printer to print out from, the paper size, orientation, print quality, paper type, etc. These settings can have a significant impact upon the quality of your printed output.
Print Now: Begins printing the image on to the selected/ default printer. Brings up the 'Print Status' dialog that tells you of the 'print progress'.
Abort: Exits back to BlackMagic main screen, without initiating printing.
Help/ Info.
This button brings up a dialog that displays information re. the product, such as the version/ release number, system ID code, etc. It also provides two buttons to access further functionality: the "